Showing posts with label digitalpainting. Show all posts

X-men Rogue

This week's post is coming a little bit early and I am headed out of town for the next week or so.
I didn't want to leave you guys without a post for the week. So this week I decided to take a bit of a break from the Nintendo book and try something different. I don't normally do superheroes (although I love them)..but since everyone else does it I like to be different. However, in the spirit of doing different things, I decided to try and paint over someone else's lines, which turned out to be pretty awesome.
I have been following this guy and Deviant art for a while (http://weaponx5203.deviantart.com/).
One day I asked him if I could pick something from his gallery and paint over the work.

He said "sure" and below is what I got:
Here are the steps to get to the end result:

1. Below: I picked the sketch of Rogue from the gallery it was the one with the cleanest lines and I was a fan of the sketch. I heard a lot that the key to a great painting is the sketch and the drawing underneath and it's really true. If you have a crappy drawing no amount of painting over it is going to fix it. See the sketch below:
2: Below: then I added a background gradient to set up the color tone of the painting:
3: Below: One tip that I picked up is before you start laying down any permanent lines, you should do some color tests. This means that you can try different color schemes and see which one works the best. Even different color backgrounds as well. In this case I kept the background green because it goes nicely with the yellow in Rogue's costume.
4: Below: I start to add color flats and the shadows and I make the decision that the light should be coming from the top right side of the image.
5. Below: One tip that I learned that also helps was to use a wireframe form lines to try and define the shape. This helps to keep the image from being flat, helps to define the form and helps when adding shadow and defining the form.
6. Below: Shadows added
7. Below I start to go over the lines and do the paintover. I will usually leave the light source indicator in place to serve as a reminder as I work.
8. Below is the final! Shout out to Weaponx for letting me paint over his work!
See you in a week guys!!!!!

http://murdockink.tumblr.com/
http://moebocop.deviantart.com/
http://twitter.com/mauricemurdock

Nintendo Tribute: Double Dragon 2


This weeks post is Double Dragon (the second part of the tribute--Jimmy Lee). I think that the first character is called Billy. For this one I decided to go against the dark background of the last post, and this time around decided to do a twilight/sunset scene. (I really like sunset scenes/shots.) I find that they are easier to create and develop than a night scene. I also tried out a new signature to make it more official in the 2K12. See below for some steps to see what I was thinking while I was painting this guy.

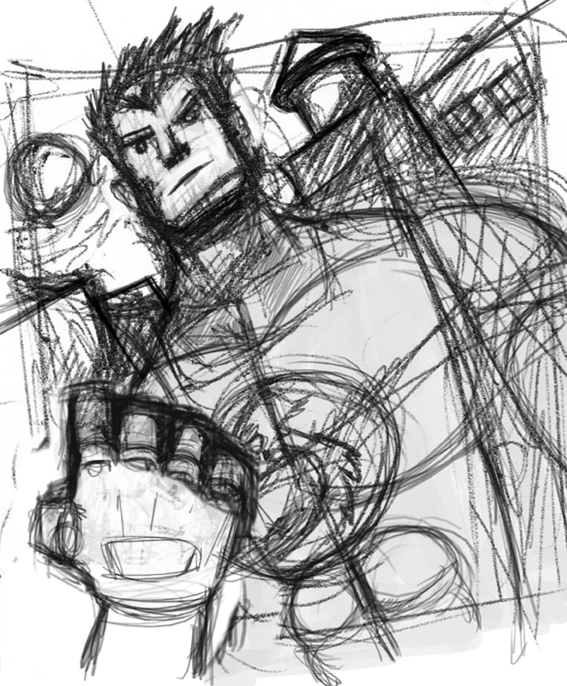
1) So after the last Double Dragon post, I decided that I needed some help. I wasn't sure where I was going wrong and looked into watching more tutorials, podcasts, etc. etc. I learned a few things such as how to create better backlighting, and also about the sketch process. Basically, the sketch is the key to doing a good piece of work. Lots of times I would scan a sketch from my sketchbook, and   then go right into painting. However this time around, I decided to take the extra step and go over my lines, because I was finding that the painting process was getting difficult. What's funny is that I still really look the textured look of sketch lines. So I will have to work to see how to make this more interesting. Anyway below is the sketch phase.


 2) and here is the line phase. I created the lines on a seperate multiple layer over the sketch layer (I also set the sketch layer to multiply). I don't know about you guys, but the layer order is the thing that always always always messes me up and gets confusing. (below)
 3) Below you see that I start to block in the basic colors on a normal layer between the basic line art layer (above) and the sketch layer that I scanned in initially. At this point I start to determine where my light source is coming from as this will help me make my decisions on shadows later on.
 4) Below I start to fill in all of the basic colors as well as determine the background. Since I want the scene to appear in a twilight setting, I decided to go with a gradient background where the sun is the source of the light and everything is hilighted accordingly. I am finding that lighting is the hardest thing to get the hang of, but is another key to making a convincing piece.
 5) At this stage I start to go over my lines and paint over the lines on a new layer.
 6) Then at this point I have a sense of where I want to go with the piece, what I need to do color wise, and what bits need more details. Usually by this point I have a sense of what I am doing and all of my basic decisions have been made so now it's just a matter of finishing things up.

7) Below is the final piece. In the background I added some clouds to fill the space and then had the colors reflect off of the clouds accordingly. You won't be able to see it really since I made it a point to soften the background. I am sure that I will learn a better way to do this. I also am going to try and work on making the piece more textured and vibrant. It seems a little too smooth. All in all though I like this one and will put this in the book!
8) Next up Ducktales. Yeah....I know..it's a game that was super awesome....and I really loved it. See ya next time.


http://murdockink.tumblr.com/
http://moebocop.deviantart.com/
http://twitter.com/mauricemurdock

Nintendo Tribute: Double Dragon

Ok, so the next in the Nintendo tribute series is Double Dragon. You played as one of two brothers or friends (I think), who had to fight your way through hordes and hordes of street gangs to rescue your girlfriend. For this particular piece I decided to try to work on anatomy, but do it in a simplified manner to suggest the form, but not go overboard with the details. Hm. It took me a while to post this one, because I wasn't too hot on how it came out, however since I need to finish things I decided to post this one as a means to move onwards and learn from my mistakes. (Practice practice practice).
Steps are below:


In the end, it's not the worst, but in practicing I learned a few tricks a long the way to make the painting process easier. If I go over my original sketches and create a simple line drawing, that will eliminate having to work so hard when starting the color phase. Also, anatomy anatomy anatomy and values. Very hard to master, but I will be psyched when I get it. So that's it for this one, next up is Jimmy Lee (Double Dragon part II).

http://murdockink.tumblr.com/
http://moebocop.deviantart.com/
http://twitter.com/mauricemurdock


Subway Guy

Something quick that I did for practice.

http://murdockink.tumblr.com/
http://moebocop.deviantart.com/
http://twitter.com/mauricemurdock


Sonic the Hedgehog!

Ok so this week, I decided to do a rework of Sonic the Hedgehog, which was something that I had done a while back. but......I thought that it was lame (colors needed work, etc. etc.). So I went back and reworked this piece a big and finished it. Below is the final work:

Below are just a few notes about the work:

 Started with a sketch. I did a couple of drawings in my sketchbook, but decided to just go with the basic front shot of Sonic running at you.


 At this point last time I stopped and thought that it was done, but I decided to go one further and add another layer and paint on top of it, and to then add the color.


I found a sparkly brush and used that on the rings in the background. Here is Sonic folks enjoy!

Next Up: Double Dragon (again) ! Yee Haw!!!

http://murdockink.tumblr.com/
http://moebocop.deviantart.com/
http://twitter.com/mauricemurdock

Nintendo Tribute: Mario

A little surprise this week as I did an extra mini piece. You can't have a Nintendo tribute without Mario. Even though Mario has been done over a million times I haven't really done Mario before, and so I figured "why not". Here is the final!

(Final!!)
Here are the steps:


I started with a basic round brush, and then instead used different brushes that I created from an actual paintbrush. I noticed that the end result looks a lot mote textured and not as flat. In addition I used a color palette from an already existing Mario image, so that I can get the colors right (before they were looking really pastelle-y and too soft.

Next Up: Double Dragon! Yee Haw!!!

http://murdockink.tumblr.com/
http://moebocop.deviantart.com/
http://twitter.com/mauricemurdock

Nintendo Tribute "Clu Clu Land" (and Process)

Here is a basic posting of the process for Clu Clu land from pretty much beginning to end.
A lot of the steps are the same, so I will only make notes where I think it is necessary:
 

1. I started with a bunch of composition sketches as always. (below)
2. I picked the one that I thought was most interesting. (below)
3. I added tones and shadows (below)
4. I then started to add the flat colors. In mid process I realized that I didn't like what was happening with the hand. I realized that it would be easier to paint in an actual hand over the image so I added that in (below)
5. I then painted over the basic colors. I decided that I didn't like what was happening with the textures in the Trojan piece, so I decided to not* get fancy and just used a basic round brush. I set the options so that the pen pressure controls would allow for a lot of sensitivity. (below)
6. The picture was very flat at this point and was missing some elements so, I added in a jewel (which is what you collect in the game) and then I also added in some poles (which in the original game your character uses to swing around and make turns to collect the jewels) (below)
7. I then tried to really push the lighting so that objects that are closer would stand out a lot more from objects that are further away (to try and give it a sense of depth) I also added in lighting and played with the shadows some more. (below)
8. Done and Done!