 This week : Cutting Technique
My High school, Hebron academy, located in rural Maine, was and is the only private school with a dedicated Outdoor education program. I spent seven seasons in the program. The first month was always the same, an intensive month of wilderness first aid training. Once we knew how to handle any emergency that might happen, we headed out to the outdoor workshop area to start learning our tools, and the first thing we learned was knife safety. Everything in knife safety is all about leaning how to use your knife in a way that will prevent harm to you and others. Rules about always cutting away from yourself, how to grip a knife and how to walk with it are designed so that if you slip, fall, or make some other mistake the knife's working end won't wind up in your fingers or torso.
When I went to college my friend Jordan, an accomplished graphic designer, taught me everything I know about cutting art materials. Cutting for art creates a whole new set of demands- not only must you not cut yourself, you mustn't damage what you're working on, either. Mistakes of less than the width of a pencil line can totally ruin some projects. Mistakes can be expensive, depending on the material you're cutting. If you make a mistake while trimming a book, you've ruined a copy of that book. Jordan taught me how to cut absolutely straight lines with a minimum of accidents, and it's one of the hand skills that's served me best throughout the years after.
The modern cartoonist has all sorts of things they might need to cut. You may cut down your own paper, and you need to be able to measure accurate right angles off the edges and run it through a printer without jamming. You might be fixing a badly drawn panel by cutting it out and replacing it with new paper. (I'll teach you that next week.) You might have to face-trim a stack of books by hand for a convention. You might need to trim matte board for a gallery show, or you might be making a sketchbook for yourself. Good cutting technique is essential to all of these tasks.
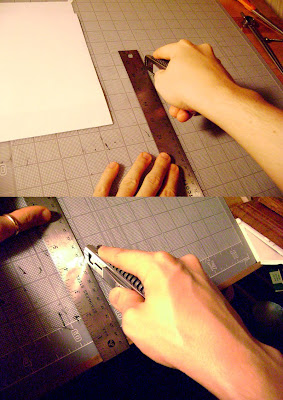
I'll start off by pointing out the most common mistake: lining up the cut by lining the ruler edge up over the line, and then lining up the cutting tool tip with the edge of the ruler:

This a recipe for an inaccurate cut. The actual tip of your cutting tool isn't exactly aligned with the side of the cutting tool, so to get the tip to line up with the ruler edge you have to angle the cutting tool at the grind angle of the cutting edge, like you see above. Even if you manage to somehow keep the blade in that position for an entire cut, you'll be creating torsion forces on the blade and on the paper, causing ragged edges, increased edge dulling and blade breakage, and increasing the likelyhood you'll catch on a slightly denser patch of paper and whong off in a bad direction because of all the force you're applying dragging a crooked blade through the material.
But chances are you won't keep that angle consistent. You'll feel all the stress you're causing and change your angle as you go. You may even follow the ruler edge but angle out the other way, like so:

What you need to do instead is place the side of your cutting tool flush against the side of the ruler, and see how far the tip is from the side, and then put the ruler that far away from your lines. That way, the tip will fall exactly on the line with the side of your tool butting against the ruler as a guide, and the cutting edge looking straight back at the line it's about to cut like a laser beam. (By the way, this is exactly the technique you should use for making accurate pencil lines- not lining the tip up with the edge, but instead moving the ruler so that the sides touch the ruler and the tip touches the line. Ever draw a pencil line with a ruler it found out it wasn't straight? You didn't do this.)

It's important to stay vertical, in case you have to stop the cut for some reason and resume it again. If yyou change angles at all, this will happen:

The change in angle means you'll start cutting a totally different path, possibly cutting off too much or too little material. Check to make sure you're keeping the blade square with the ruler on every axis, and your cuts will be consistent every single time. No more going back for a second pass and peeling off a thin curl of paper because it wasn't quite lined up with the last cut.
If you click on the photo below to enlarge it, you'll see the terrible gap left by a cut whwre the blade changed angles as it went. You can't measure off of it, and you can't use it for construction, because it won't marry with another edge. If you cut too much off this edge instead of too little you'd have to throw it away or toss it in the scrap pile, at your cost.
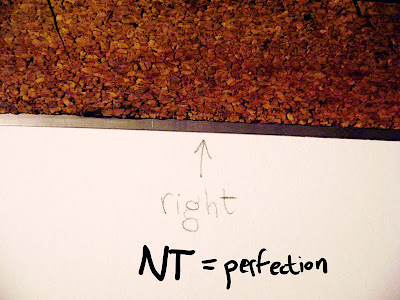
Contrast it to the edge cut the right way, which fits pretty snugly. (There are a very few small gaps, because I was wearing my face rig and it was distracting my cutting.)

By the way, I really prefer the NT cutter I reviewed for making straight cuts. The wider blade makes it easier to follow the ruler, and the ergonomics of the handle better accommodate long, straight cuts.

Here you can see it leaves an edge so gapless it looks like I put the paper under the ruler instead of next to it:
If you draw a line you want to cut with a pencil you can't just keep the ruler in the same spot and make the cut. Why? Because the distance between the sides and tip of your pencil is probably pretty different that that of your cutting tool. You can see how far off it is for me:

You need to do the alignment first for your pencil, and then again for your cutting tool. Here we are all readjusted nice and flush:

Now let's talk about cutting a corner. Sometimes you can keep cutting past the corner because you're going to throw away the excess anyway- but sometimes you need that corner to stop neatly right at the exact point where the lines meet.
In that case, you need to make 2 cuts starting in that point and cutting away. CAREFULLY start by putting the tip exactly on the point and cutting yourself a short slice, making sure you never cut past the point.

Once you have a nice, safe cut back from the delicate point, you can proceed as usual. on that side. Then do the same for the other side.

While doing this part of the demo I actually made a mistake and didn't tip-check the line like I should have trusting my eyeballing, and look how far off I was.:

I made the rest of the cut correctly to show how bad a mistake this was. If this was a project meant for display it would have been ruined because of my carelessness. Always, ALWAYS check to make sure the tip of your tool is on the line, at both ends of the line. Actually touch the tool down and check. If you think that little extra time is frustrating, try ruining a tedious project and having to start all over.

Ergonomics is an important consideration in making accurate cuts, especially long ones. You should never cut directly in front of you, because as you draw your hand back your wrist will be put into a terrible position:

What you want is for your wrist to be able to stay in the same position through the entire cut. You can cut down on the side of your cutting hand, like so:
Or you can cut at an angle, pulling down towards the side of your cutting hand, like so:

Either one will allow you to move comfortably. If your light is blocked by your hands in either of these positions, move the light if you can.
Now let's talk about cutting stacks of paper, like when performing a face trim on a minicomic. Never is is as important as with this task that you maintain the same square angle with the blade, as you will be making many cuts, all of which need to be the same.

The temptation when cutting a stack of sheets (or thick material like foamcore) is to get through it as fast as possible with hard, deep cuts. In knife training you learn that the more force you apply, the more risk of accidental damage to yourself, and with art cutting more force means more chance of accidental damage to what you're working on. (and yourself.) What you want to do is make your cuts with fairly low pressure, and work on keeping them as straight and accurate as you can. Imagine a laser slowly eating through the hull of a very thick spaceship, making one pass, then another, then another, forming a clean edge.
Inaccurate cuts will lead to curved, frayed edges like this:

Here's a copy of my comic Out Of Water, face trimmed properly. See how all the pages are straight and flush? (For those of you wondering what face trimming is: When you fold a stack of paper into a book, the center sheets bulge out and make it very hard to flip through, plus it looks ratty. Face trimming is cutting off that excess.)

The final consideration when cutting is what side to place the ruler on. Usually you have a side with stuff you want to keep and stuff you're trimming off.

Knife safety assumes that accidents will happen, and they do, even to very experienced people. Knife safety therefore works to minimize the damage of an accident. You can use your ruler to minimize the chance of damage to the stuff you want when you cut by physically protecting it should the ruler veer off for any reason. Always place your ruler over the stuff you want to keep, like so:

This will prevent this from happening:

Now, sometimes you want the stuff on both sides of a cut, and in that case you'd just better follow all my other advice really carefully and hope for the best.
Next week, I'll demonstrate a technique I invented for replacing panels that's so seamless it's almost impossible for someone to tell where the original was cut, unless they know what to look for.
 So, it came up several times this last week with several coworkers, who in my case are artists, that they didn't realize the bones in your hand don't bend in the location illustrated in the title. I can sort of see why someone might think it, so I'm just gonna toss this out there for people. In fact, your bones don't bend at either that line, nor the line seperating the palm from the fingers. The pad at the top of your palm actually comes both a little above and a little below your knuckles. Your knuckles are roughly in the middle of the pad, as you can see in the illustration:
 So when you bend your fingers down, the pad, which makes the bones in your palm appear longer than they are, gets bent down. This makes the palm seem to shorten and makes it look like the palm bones themselves must be bending. The phonomenon is easier to understand from the side:
 If you really want to prove it to yourself, fold your hand while looking at the back. You will see that the back does not change in length at all.


