 The drop-out rate for newcomers to the brush is staggering. No one ever learns how to draw with a brush. They always come from using a nib or a marker to ink, and then they try the brush. They've seen Charles Burns or Craig Thompson or whoever, and they want their lines to have that thick, wet crispness, that texture, that delicacy. So they buy themselves a brush, and- okay, wait a second. Before I even finish that sentence, let me tell you how to find a good brush, or else everything else I say will be totally worthless.
If you go to an art supply store, you'll be lucky if one in ten brushes is any good, and you'll be lucky if there are ten brushes all in the size and shape you want. A crappy expensive brush, as I have said before and cannot emphasize enough, is worse than a cheap brush. A cheap brush will make boring lines with less variation, and it will die an early death, but it will work. Drawing with a bad expensive brush is like shooting with a gun whose barrel flails about like the trunk of an enraged elephant. Expensive brushes have springy, resilient hairs that will keep their snap for decades if treated with care. If the moron who made the brush left a single hair out of perfect alignment, it will burst out of the side of your brush during every single stroke like the Kool Aid man coming through a kitchen wall. It will subvert every line you try to make. And God help you if it's your first brush, because it will surely be your last.
It is important- VITALLY IMPORTANT- that you never, ever buy an expensive brush without testing it. Ever. EVER EVER EVER EVER EVER EVER. Do you detect in my tone that I may have made this mistake myself? EVER.
So, here is one of the top three most useful, invaluable pieces of information I have ever been given as an artist: here is how to test a brush.
Step 1: Any art store that deserves anybody's money has a basin of water (and sometimes some nifty testing paper) for testing brushes. Take the brush and soak the bristles real good. Get all the glue sizing out of them. Swish the brush around until it's sopping and swollen and tender, like this:
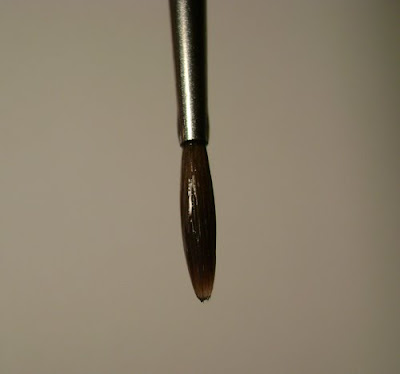 Step 2: Now hold it by the back of the handle, and with a light bur firm tap , bring it down ONCE onto your wrist. This is a tap, not an attempt to raise a welt. It should be just hard enough to make a little sound and shake the water from the brush.
 Step 3: if the brush is a good brush, it will come to a perfect, razor-sharp, single-hair point. The sides will be smooth and taper evenly. Not a single hair will splay, and no part of the sides will bulge. Here is my Rosemary and Co. #2 brush, made by the same Rosemary and Co. that I mentioned in last week's post:
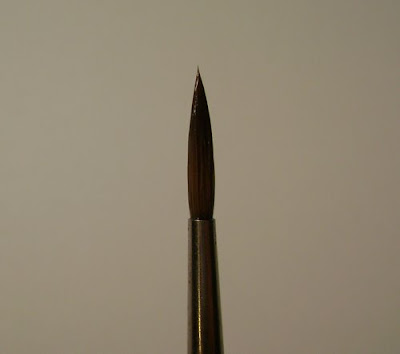 If your brush does not look EXACTLY like this, if it has even the most miniscule flaw, put it down before it's evil spreads into your drawing hand.
If you visit five stores and none has a brush that passes and you really need a brush, STILL DO NOT BUY A BRUSH. Get an inexpensive brush that will be hard to work with but which will at least make lines.
Okay, so to continue my thought from before: people use a nib or a marker and then they get a brush, and what do they do? They use it like a pen. Using a brush like a pen is like putting a car into a slide: fun for experienced drivers, dangerous for beginners.
Allow me to illustrate the difference between a pen and a brush with an analogy:
Imagine you have sandy beach and a stick. The stick is the nib, the sand the paper. You take your stick and draw a circle with the tip. It looks just fine, a smooth circle.
Now you put a mop on the end of the stick, and you reach out the stick to draw a circle again. As you start your stroke it seems to be working. The mop drags behind the stick, making a line. But as you come around the curve, the mop twists and bunches up. The line becomes unruly, the mop twists and tangles.
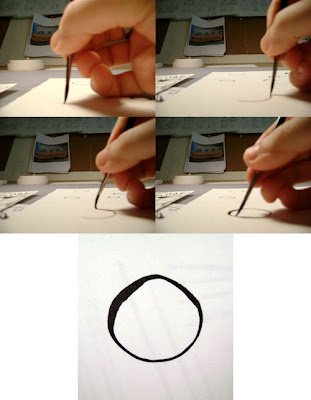
Here is what a circle looks like when you handle a brush this way; note how distorted the tip becomes with pressure as the bristles are forced into a steep angle, the way the tip flips and smooshes into all sorts of shapes and widths:
Now you try it another way: instead of holding the stick out in front of you and drawing the circle, you get right over it and keep the mop perfectly vertical, and you carefully move the vertical stick so that the mop drags behind in a smooth, consistent curve. (The example below is a little wonky because I was drawing with one hand and photographing with the other.)
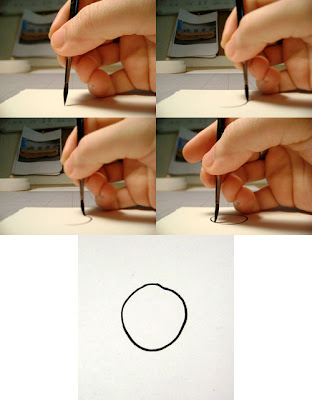 As you can see, the handle is always in front of the stroke, the tip of the brush trailing in back. The tip never becomes bent back or twisted.
Because brushes are so soft, and because making a controlled, consistent line means holding the brush vertically at all times, it's useful to think of elevation instead of pressure when you want to change the thickness of a line at any point. Don't think if it as pressing down or letting up. Imagine your hand is a helicopter with a brush underneath it, and when you want a thicker line you decrease your altitude and when you want a thinner line you increase your altitude. You always fly so that your windshield is ahead of you and the bristles trail on the ground in back of you.
Taking curves is the hardest part for beginners with a brush- you'll be going around a curve just fine, and then WHAM- the brush winds up splayes out or a hair splits off:
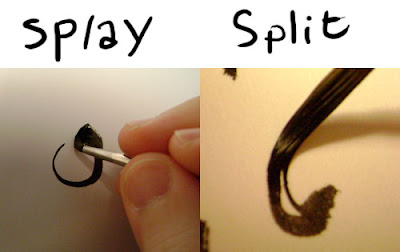 This is the result of handling a brush handle the way you would a pen stock.
You are using a new tool now, and it doesn't work anything like your old tools. Forget what you know and THINK about what flexible, springy bristles are likely to do when pressed into a tight turn. React accordingly.
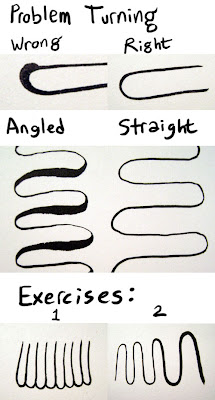
For those new to brushes, below are some common problems and exercises that will help you overcome them. I used these exercises to train myself to the brush, and I still do them to warm up if I haven't used a brush in a long while:
If your brush seems to fly out of control on turns or changes width totally uncontrolled, the two exercises on the bottom of this image will help: Try drawing a row of fingers, like piano keys, and don't let the line get thicker at the tip of the finger.If you can do a row without messing up you're pretty good to go.
Also, try doing ziggy-zaggy curves, either without letting the width change, or while changing the width, but in a smooth, consistent way. Remember: it's a change in elevation, not pressure. Fly in the same pattern, but lower.
 Drawing circles is tough with a brush: it's hard to make the line connect back up without being able to see where they meet. On the bottom, you can see the trick: you start a circle tapered, then expand to the width you want, then you draw right on past the beginning, and taper off inside the line, leaving an overlapping, invisible join.
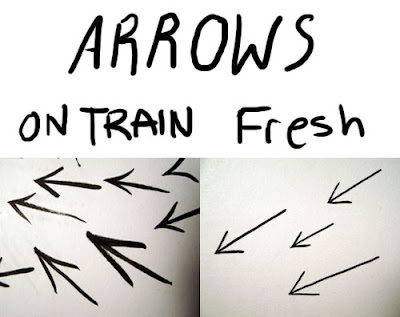
 Drawing arrows is a great way to practice accuracy. The exercise is to draw a 3-stroke arrow where the stem comes out of exactly the middle of the two lines of the cap, and with a perfect pointed tip. On the left are some I drew on a train while exhausted, and on the right are some that I did while feeling fresh and spunky. I find that this exercise is really good at showing my mental state better than any other exercise. If I can't do this exercise it means I need to take some time to get into the zone before I ink, or else I'll be sloppy and mess up.
 These exercises will allow you to gain confidence and control with your brush, which is needed for doing small, detailed work like this hand, for instance:
Nest week: Helicopter draws a picture