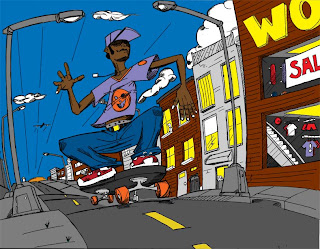
Normally I like to do a post a week...and I have fallen off of this schedule. I mainly realized that I was starting to post a lot of crap for the sake of posting. I have also begun a Photoshop class in coloring and digital painting, which has so dramatically improved my working knowledge of Photoshop and how to use it to color. Although the tools are not exactly as user friendly as Painter..it renders pretty beautifully if you know how to use it.
I redid a drawing and decided to color it using Photoshop...
Basically the process starts with a sketch or drawing. What I was missing before was to sharpen the drawing using the unsharp mask tool, and to then also adjust the blacks and the whites in the layers adjustment settings. This removes the paper grain that is usually picked up in scanning. (above)
The next step is to begin to block in the colors. This part takes soooo long....you are basically using the magic wand tool to select areas in the drawing. I learned here that the magic wand is an unforgiving tool. With the combination of the magic want tool and the paintbucket, you have a basic layer of color laid down. (above)
Then using the Hue/Saturation menu options and the magic wand tool (again), you then move on to adjusting the color values so that they compliment each other. Looks much better here... (above)
Then you copy the layer once you have the colors the way you want them, and start to apply the brush values to make it look like a painting. Using the flat layer as a basis, you use lighter and darker color of the same value and add shadows and hilights. (above)
Just about done here...I then added ambient sunlight in the background so that it has the effect of the sun going down. Looks more convincing here.. (above)
There are a couple of other things that I could to with some trick brushes in Painter...but for the most part this is good to go! Woo Hoo!


